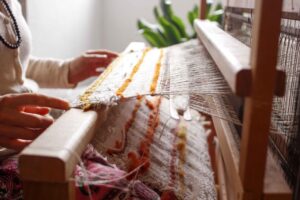

You do not need a studio or a large floor loom to start weaving. A compact frame loom, a few basic tools, suitable yarn, and a clear table or work surface are enough for a first project.
This guide explains how to choose beginner-friendly supplies, set up a simple project, weave plain weave, and correct common tension problems.
Starting with a coaster, small wall hanging, or sample will help you learn how warp tension, weft placement, and yarn thickness affect the finished fabric.
Weaving Basics for Beginners: Loom Types, Yarn Choices, and Essential Terms
Before buying supplies, decide what you want to make. A small frame loom works well for wall hangings, coasters, and other tapestry-style projects. A rigid heddle loom is better suited to weaving lengths of cloth for scarves, table runners, and similar items. When comparing looms, consider the weaving width, included tools, setup instructions, storage space, and availability of replacement parts.
For a first project, choose smooth, medium-weight yarn in colors that make each row easy to see. A firm, low-stretch cotton yarn is a practical warp choice. Wool, cotton, or acrylic can be used for the weft, depending on the texture and finish you want. Fuzzy novelty yarn can hide the structure, snag on neighboring threads, and make tension more difficult to assess.
For example, a first woven wall hanging could combine a cotton warp with a softer wool or acrylic weft. The warp provides structure while the weft supplies color and texture.
- Warp: the threads held under tension on the loom. On many frame looms, these run vertically while you work.
- Weft: the yarn passed across the warp to build the woven fabric.
- Shed: an opening between raised and lowered warp threads through which the weft passes.
- Plain weave: a basic structure made by passing the weft over one warp thread and under the next, then reversing that order on the following row.
If the edges begin pulling inward, the weft is probably being drawn too tightly. Leave a slight curve or “bubble” in the weft before pressing the row into place. This gives the yarn enough room to travel over and under the warp without narrowing the project.
A basic tool set may include a tapestry needle or shuttle, a shed stick if the loom uses one, a weaving comb or beater, scissors, and a tape measure. A starter kit can be convenient, but check which tools and instructions are included before buying.
How to Start Your First Weaving Project at Home Step by Step
Begin with a small project such as a woven coaster, mug rug, sample, or mini wall hanging. A compact frame loom is sufficient for tapestry-style pieces, while a rigid heddle loom is useful if your goal is to make cloth with finished edges.
For a 6-by-8-inch wall hanging, you might use one firm warp yarn, one or two weft colors, a tapestry needle, scissors, a weaving comb, and a wooden dowel for display. Exact yarn amounts will depend on the loom spacing, yarn thickness, and density of the weaving.
- Warp the loom: Attach the warp according to the loom instructions. Keep the threads evenly tensioned—firm enough to hold their shape, but not so tight that the loom bends or the yarn is overstretched.
- Begin plain weave: Pass the weft over one warp thread and under the next. On the following row, pass over the threads you previously went under.
- Set each row: Leave a gentle curve in the weft, then use a comb or beater to move the row into place. Aim for consistent spacing rather than packing every row as tightly as possible.
- Monitor the width: Measure the project periodically or compare it with the loom width. Adjust gradually if the sides begin drawing inward.
- Finish the piece: Follow the loom’s removal instructions and secure the warp ends with knots, hemstitching, or another finish appropriate to the project. Trim fringe only after the ends are secure.
Take a photo before removing the weaving from the loom. The image can help you identify where the width or row spacing changed and provide a useful reference for your next sample.
If written instructions are difficult to follow, a clear video lesson can make hand position, weft placement, and tension easier to understand. Keep the first project simple so you can focus on rhythm, spacing, and how the yarn behaves.
Common Beginner Weaving Mistakes and How to Improve Your Technique
Pulling the weft too tightly is a common cause of inward-curving edges. Leave a small “bubble” or gentle arch of yarn before pressing the row down. Check the project width every few rows so you can correct the tension before the change becomes pronounced.
Uneven warp tension can produce loose sections, tight ridges, or wavy fabric. Before weaving, run your fingers gently across the warp and compare the tension of neighboring threads. Make small adjustments rather than tightening one thread sharply.
- Skipping a sample: Test yarn thickness, color combinations, and weave structure on a small section before committing limited or costly materials to a larger project.
- Choosing difficult yarn: Very stretchy, slippery, fuzzy, or uneven yarn can make the structure harder to see and control. Save it for accents until you are comfortable with plain weave.
- Beating too hard: Packing every row firmly can produce stiff fabric. The appropriate density depends on whether you want a firm tapestry surface or a fabric with more drape.
- Losing the over-under sequence: Check each row before beating it into place. If two neighboring rows follow the same path, undo the new row and correct it.
- Changing tension midway: Measure the width periodically and use a similar hand motion for each pass of the weft.
If the bottom of a wall hanging is wider than the top, changing weft tension is a likely cause. Measure the weaving every few inches and adjust your hand pressure gradually. Small corrections made while the project is still on the loom are easier than trying to reshape the finished piece.
Closing Recommendations
Starting weaving at home is less about having an elaborate setup and more about choosing an appropriate loom, using manageable materials, and completing a small practice piece. Each sample can teach you something about tension, spacing, pattern, and texture.
Best next step: choose a compact beginner-friendly loom, gather smooth yarn and basic tools, and complete one plain-weave sample before purchasing more equipment. If you enjoy the process, add tools and try larger projects gradually.
The WeaversRock Crafts Editorial Team researches, prepares, and reviews practical content about weaving, handmade crafts, creative home décor, beginner-friendly projects, and small craft businesses.
Our goal is to provide clear instructions, realistic ideas, useful comparisons, and responsible safety guidance for readers who enjoy creating by hand. Articles are reviewed for clarity, relevance, consistency, and obvious factual issues before publication.
We do not claim professional qualifications, personal testing, or first-hand experience unless those claims can be supported. Readers should always follow manufacturer instructions, use suitable tools, and take appropriate safety precautions when completing a project.